
Joinery in woodworking is the process of fusing two or more pieces of wood together to produce a smooth, long-lasting surface. Naturally, joinery techniques differ based on the type of wood used, and whether it is softwood or hardwood will influence what you do. This is related to the kind of equipment you have as well. shiplap joinery, click & lock joints, and other methods are examples of common joinery techniques.
Depending on the type of project you are working on, proper woodworking joinery is crucial for producing flooring or furniture that is both long-lasting and aesthetically beautiful. It calls for dexterity, focus on the small things, and specialised tools and gear. Skilled woodworkers are knowledgeable in the craft of joinery and can guarantee quality by.
This is the second part of our article. Click here to read about the 5 first techniques we detailed.
Lap Joint:
This technique involves overlapping the two boards and glueing them together. It's a simple technique that is often used in DIY woodworking projects.
A lap joint is a type of joint where two pieces of material, typically metal or wood, overlap each other and are fastened together. In this joint, one piece of material is placed on top of another piece, and the two are fastened together at the point of overlap. The lap joint is commonly used in woodworking, metalworking, and construction.

The lap joint is a simple and strong joint that can be easily made with basic tools. It is often used to join two pieces of material of the same or different thicknesses. The joint can be made with screws, nails, bolts, or adhesives.
The strength of a lap joint depends on the length of the overlap, the thickness of the materials, and the type of fastener used. Longer overlaps and thicker materials will result in a stronger joint. Additionally, using a stronger fastener, such as a bolt, will increase the strength of the joint.
There are different types of lap joints, including the half lap joint, the full lap joint, and the scarf joint. The half lap joint is where each piece of material is cut halfway through, so that they overlap by half their thickness. The full lap joint is where each piece is cut all the way through and overlaps completely. The scarf joint is a variant of the full lap joint, where the overlapping pieces are cut at an angle to create a longer overlapping area.
Shiplap Joint:
This is a type of lap joint where the boards are cut with an overlapping, stepped edge. It's a popular technique for creating a rustic, shiplap-style flooring.

A lap joint and a shiplap joint are similar types of joints used in woodworking, but they have some differences in how they are constructed and their specific applications.
A shiplap joint is a type of joint used in woodworking and construction where two boards are joined by overlapping their edges. The boards are cut so that each has a groove cut along its length and a tongue cut along the edge. The tongue on one board fits into the groove on the other, creating a flush surface.
The shiplap joint is commonly used for exterior siding, interior panelling, and flooring. It provides a tight, secure fit that helps to prevent water infiltration and insect damage, making it ideal for use in areas with high moisture or insect activity.
To create a shiplap joint, the boards are typically cut using a table saw or a router with a shiplap bit. The depth of the groove and tongue can vary depending on the thickness of the boards being used and the desired look and feel of the joint.
Overall, the shiplap joint is a simple and effective way to join boards that provides both strength and aesthetic appeal.
Finger Joint:
A finger joint is a woodworking joint that is used to join two pieces of wood together end-to-end. It is also known as a box joint or comb joint. The joint consists of a series of interlocking rectangular or square fingers that are cut into the ends of the two pieces of wood being joined.
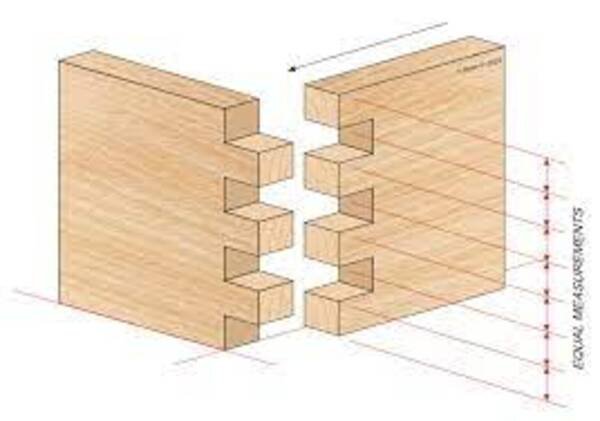
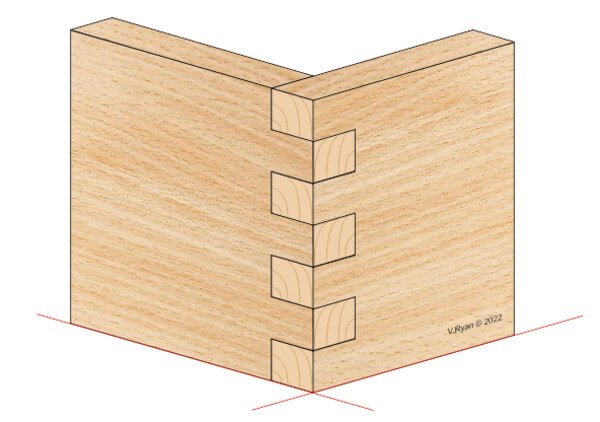
The fingers of the joint are typically cut to the same width and depth, and the joint is assembled by interlocking the fingers together. This creates a strong and stable joint that is often used in furniture making, cabinetry, and other woodworking applications.
Finger joints can be cut by hand using a saw and chisel, or by using a router with a specialised finger joint bit. The joint can also be created using a finger joint jig on a table saw.
One advantage of the finger joint is that it maximises the amount of surface area that is glued together, providing a strong and secure joint. It also allows for the joining of shorter pieces of wood to create longer pieces, reducing waste and increasing the usability of wood scraps.
Miter Joint:
A miter joint is a woodworking joint made by joining two pieces of wood, typically at a 45-degree angle, to form a corner. The joint is commonly used in picture frames, door and window casings, and furniture.
The miter joint can be cut using a handsaw or a power saw, such as a miter saw or a table saw. The angle of the cut is typically 45 degrees, but can be adjusted to create different angles as needed.

When cutting a miter joint, it is important to ensure that the two pieces of wood are cut precisely at the same angle and length. This can be achieved by using a miter box or a miter saw with a laser guide or digital display.
To assemble the joint, glue is applied to the mitered surfaces and the two pieces of wood are clamped together until the glue dries. Reinforcing the joint with nails or screws is also common practice for additional strength and stability.
While miter joints are commonly used for decorative purposes, they can also be used for structural purposes when reinforced properly. However, miter joints are not as strong as other joints, such as the dovetail or the mortise and tenon joint, and may require additional support or reinforcement for heavy-duty applications.
Click-Lock Joint:
A click-lock joint, also known as a snap-together joint, is a type of interlocking joint used in flooring installation. It is designed to make installation quick and easy, without the need for nails or glue.
Click-lock joints are commonly used in laminate, Stone Plastic Composite vinyl, and engineered hardwood flooring. The boards are manufactured with interlocking edges that snap together when installed. This creates a tight, secure joint that locks the boards in place and provides a smooth, seamless finish.
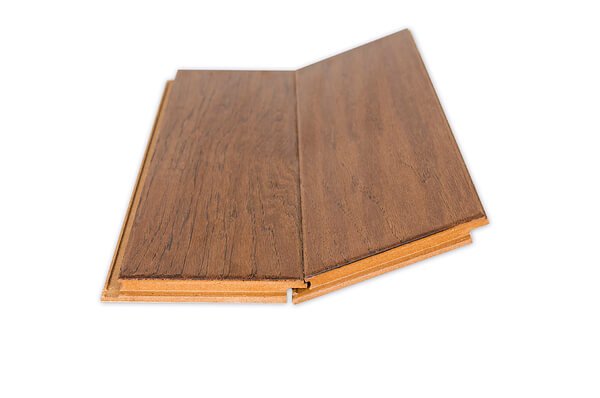
To install click-lock flooring, the boards are laid out and snapped together, with the edges interlocking tightly. The boards are then locked into place by gently tapping them with a rubber mallet or a tapping block. This creates a strong, stable surface that can be walked on immediately.
One advantage of the click-lock joint is its ease of installation. It eliminates the need for special tools or adhesives, making it a popular choice for DIY flooring projects. Additionally, because the boards can be installed quickly and easily, installation costs are often lower than other types of flooring installation.

Overall, the click-lock joint is a simple and effective way to install flooring that provides both strength and aesthetic appeal. However, it is important to choose high-quality flooring with well-manufactured click-lock joints to ensure a long-lasting and durable floor.