
When it comes to enhancing the beauty and functionality of your outdoor space, a well-constructed deck is a fantastic addition. To take your deck to the next level, consider adding wooden stairs.

These not only make your deck more accessible but also add an appealing design element. Building wooden stairs for your decking is a rewarding DIY project that can be accomplished with some basic carpentry skills and the right tools. In this step-by-step guide, we'll walk you through the process.
Materials and Tools You'll Need:
Before you start, gather the necessary materials and tools:
Materials:
Pressure-treated wood boards for the steps
Pressure-treated wood boards for the stringers
Galvanized screws
Gravel or crushed stone (for the base)
Concrete (for footings)
Concrete forms
Metal brackets
Tools:
Measuring tape
Level
Circular saw
Carpenter's square
Screwdriver
Shovel
Hammer
Safety gear (gloves, goggles, ear protection)
Step 1: Design and Planning
Start by determining the height and width of your stairs. Measure from the ground to the top of your decking. Divide this height by the desired height of each step, usually between 6 to 8 inches, to find the number of steps needed. Ensure that your design complies with local building codes.
Step 2: Dig the Footings
Dig holes for your footings at the base of where your stairs will be. The depth and diameter of these holes should adhere to your local building codes. Pour concrete into the holes, place concrete forms, and allow them to cure.

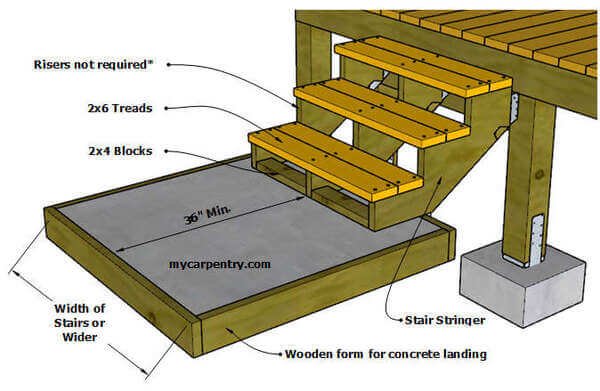
Step 3: Install the Stringers
Stringers are the diagonal boards that support the stairs. Calculate the number of stringers needed based on your design. Attach them to the deck using metal brackets, ensuring they are level and securely anchored.
Step 4: Build the Steps
Cut the pressure-treated wood boards to the width of your steps. You will need two boards for each step. Use a carpenter's square to ensure they are cut at a perfect 90-degree angle.
Step 5: Assemble the Stairs
Attach the steps to the stringers using galvanized screws. Make sure each step is level and securely fastened. Continue this process for each step until your staircase is complete.

Step 6: Add Railings (Optional)
For safety and aesthetics, you may want to add railings to your staircase. These can be constructed using pressure-treated wood or metal balusters.
Step 7: Finishing Touches
Inspect your newly constructed stairs for any rough edges or splinters. Sand these areas and finish the wood with an outdoor wood sealer or stain to protect it from the elements.
Step 8: Safety Check
Finally, perform a safety check to ensure your stairs are sturdy, level, and meet all local building codes. Invite a friend or family member to test them out with you to ensure they can safely ascend and descend.
Congratulations! You've just added a beautiful and functional wooden staircase to your deck. Now you can enjoy easy access to your outdoor oasis.
Remember that safety should be your top priority throughout this project. If you're unsure about any aspect of building wood stairs for your decking, it's always a good idea to consult with a professional carpenter or contractor. Enjoy your new deck stairs and the expanded outdoor space they provide!